
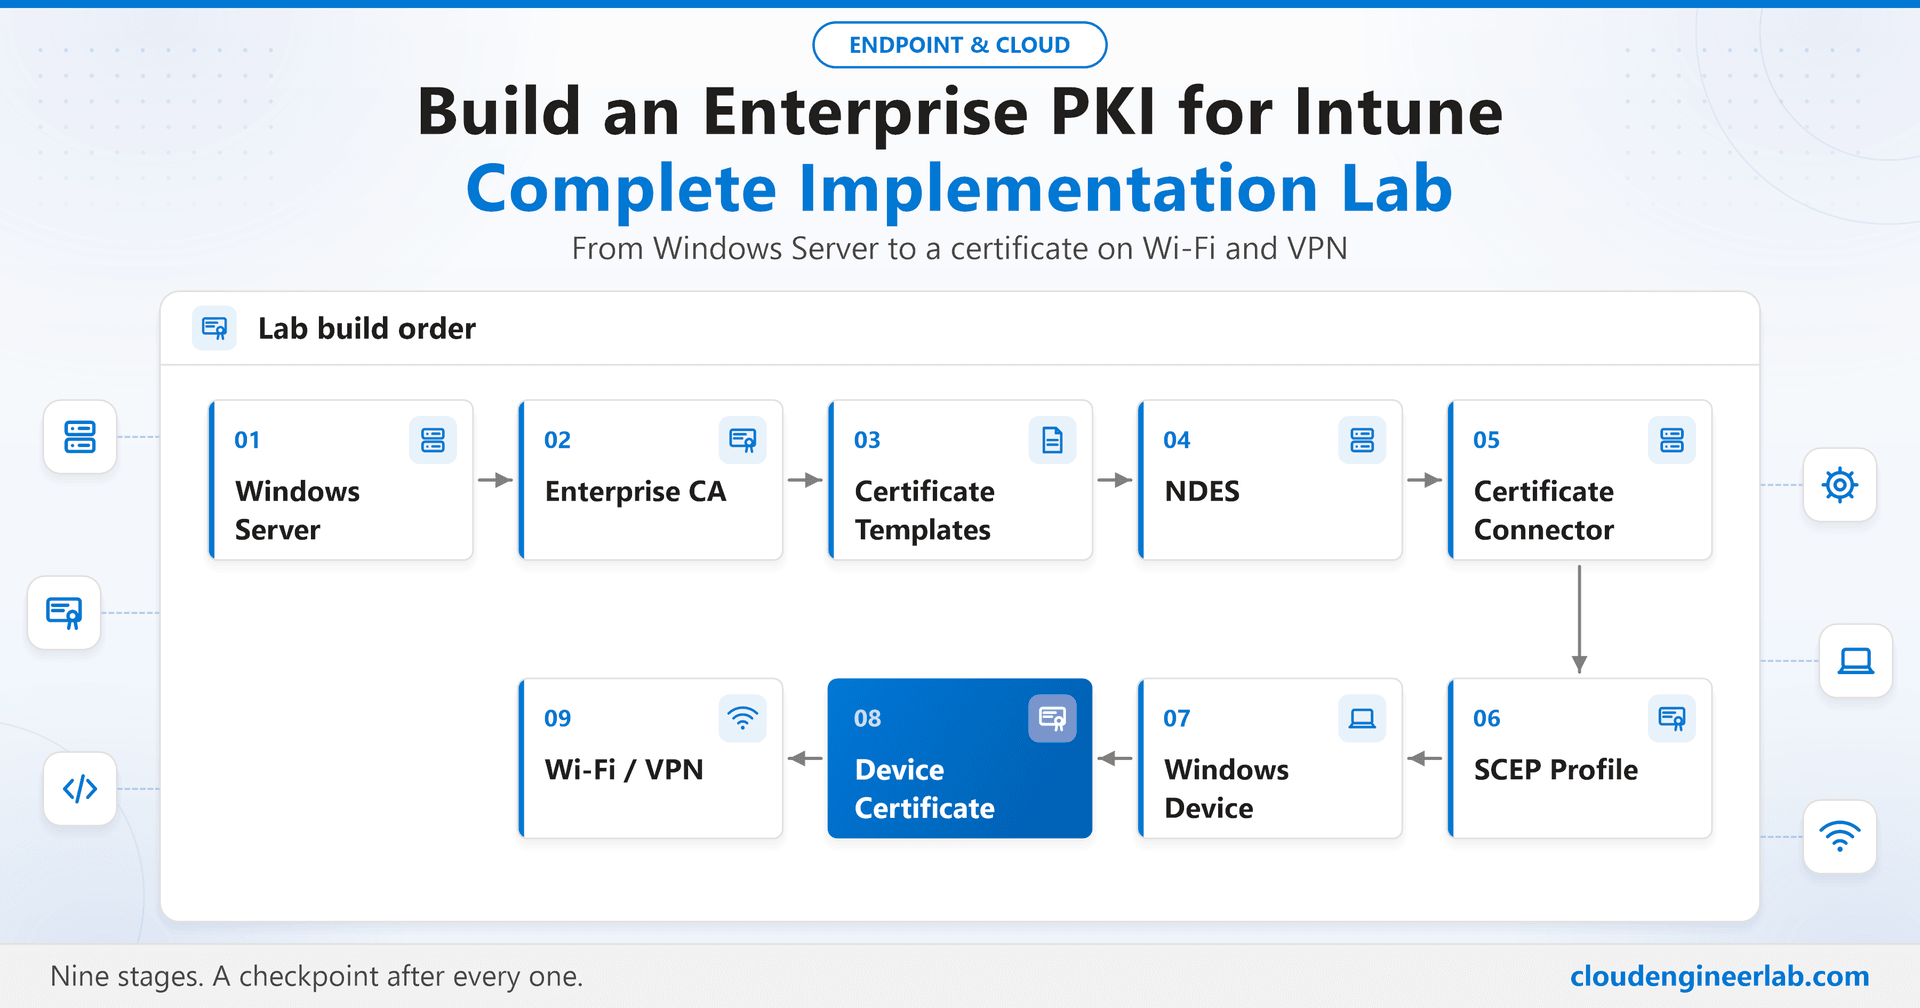
Build an Enterprise PKI for Intune: Complete Implementation Lab
A hands-on lab: build AD CS, templates, NDES and the Intune Certificate Connector, issue a TPM-backed SCEP certificate, and use it for Wi-Fi and VPN.
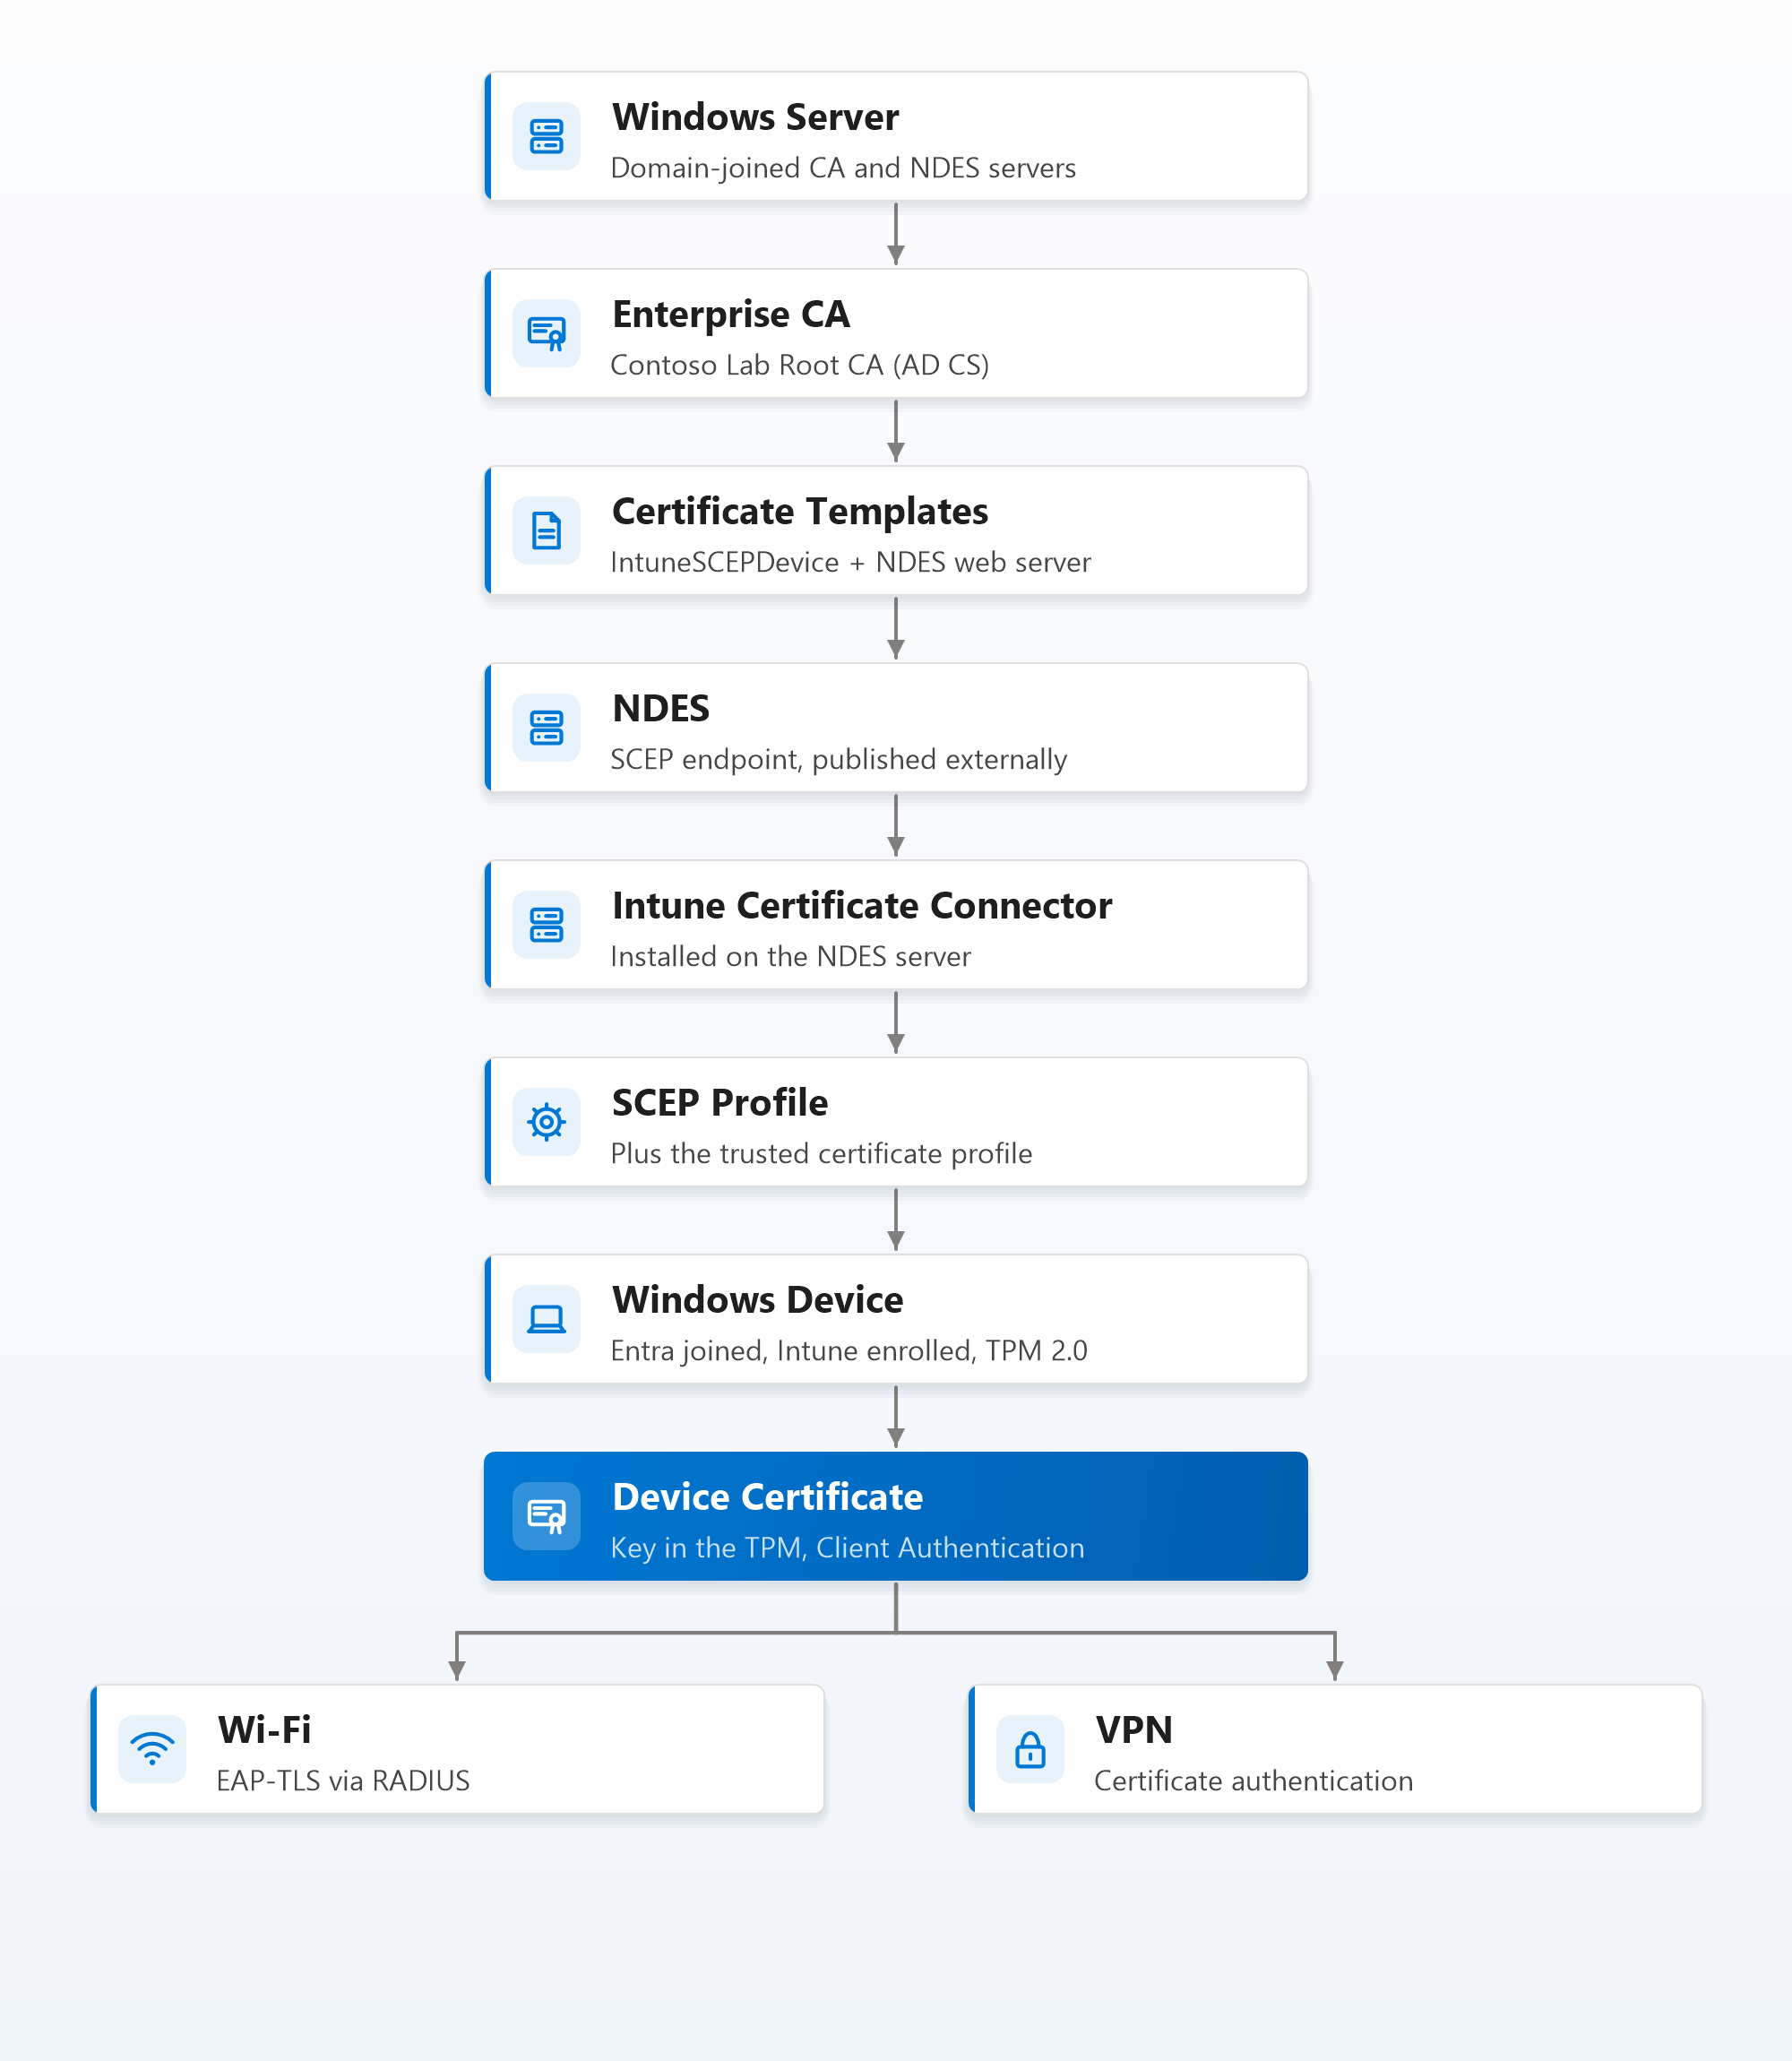
The Intune PKI deep dive explains what every component does and why. This post is the other half: you build it. By the end, a real Windows device will have requested a certificate through NDES, stored its private key in the TPM, and used that certificate to connect to Wi-Fi and VPN.
Every stage ends with a checkpoint (a command you can run and the result you should see) and a short if it fails table. Don't move to the next stage until the checkpoint passes. PKI problems compound: a template mistake in Stage 3 shows up as a confusing device error in Stage 7, and finding it from there takes far longer than catching it where it happened.
About the screenshots in this lab
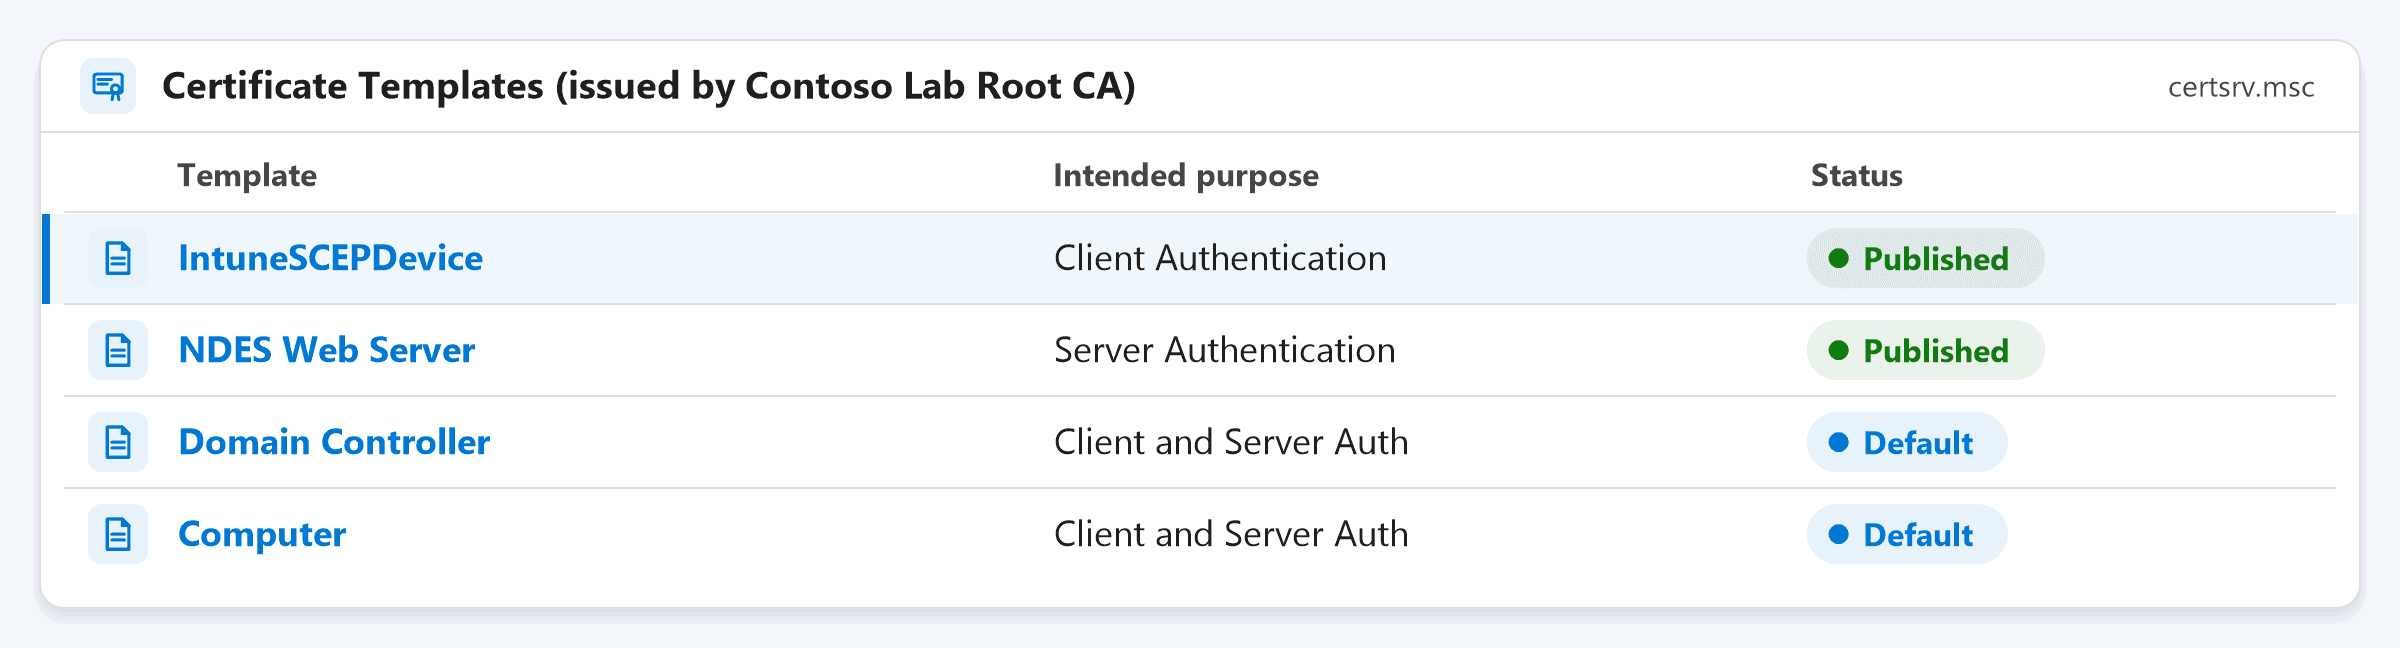
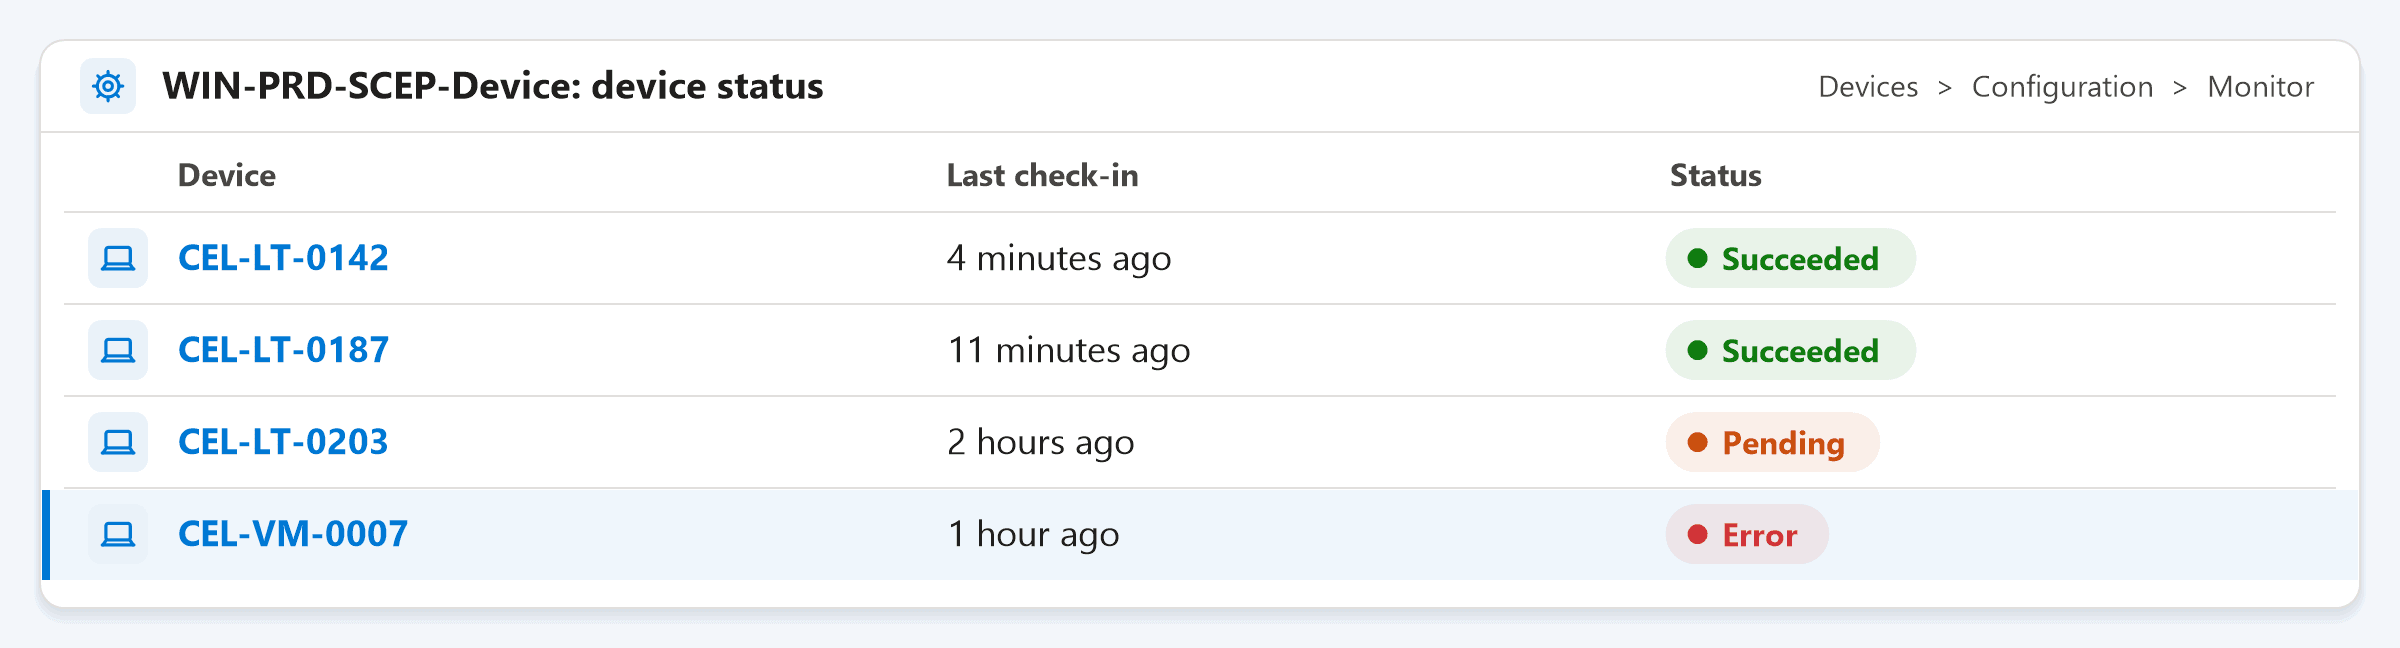
The screen images in this post are illustrative mockups of the consoles and portal pages you will be looking at, drawn to show what a correct result looks like. They are not captures from a live tenant. The commands and their expected output are the real checkpoints.
Lab Environment
| Machine | Role | Notes |
|---|---|---|
CEL-DC01 | Domain controller, DNS | Domain contoso.local |
CEL-CA01 | Enterprise CA (AD CS) | Windows Server 2022 or 2025, domain-joined |
CEL-NDES01 | NDES + Intune Certificate Connector | Separate member server, never the CA |
CEL-LT-0142 | Test device | Windows 11 with TPM 2.0, Entra joined, Intune enrolled |
You also need an Intune administrator account, a group containing the test device (this lab uses GRP-SEC-WIN-PKILab-PIL, following the naming standards), and a way to publish NDES externally: Microsoft Entra application proxy is the simplest.
Lab hierarchy vs production hierarchy
To keep the lab short, CEL-CA01 is a single Enterprise Root CA that issues certificates directly. In production, use the two-tier design from the deep dive: an offline standalone Root CA plus an online Issuing CA. Every later stage of this lab works exactly the same way against an Issuing CA.
Stage 1: Prepare the Windows Servers
What you build: two domain-joined member servers with static IP addresses and working DNS.
Join CEL-CA01 and CEL-NDES01 to the domain, set static IPs, and patch both fully before installing any roles. Then create the NDES service account on the domain controller:
New-ADUser -Name "svc-ndes" -SamAccountName "svc-ndes" `
  -AccountPassword (Read-Host -AsSecureString "Password") `
  -Enabled $true -PasswordNeverExpires $true
Checkpoint 1
On each server, Test-ComputerSecureChannel returns True, and nltest /dsgetdc:contoso.local returns your domain controller. Get-ADUser svc-ndes returns the new account.
| If it fails | Fix |
|---|---|
| Secure channel returns False | Rejoin the domain, or run Test-ComputerSecureChannel -Repair |
nltest can't find a DC | The server's DNS points at the wrong server; it must use the DC for DNS |
Stage 2: Install the Enterprise CA
What you build: a working certification authority, with revocation information published over HTTP.
On CEL-CA01, signed in as an Enterprise Admin:
Install-WindowsFeature ADCS-Cert-Authority -IncludeManagementTools

Install-AdcsCertificationAuthority -CAType EnterpriseRootCa `
  -CACommonName "Contoso Lab Root CA" `
  -KeyLength 4096 -HashAlgorithmName SHA256 `
  -ValidityPeriod Years -ValidityPeriodUnits 10 -Force
By default the CA only publishes its CRL and certificate to LDAP, which Entra joined devices and many RADIUS services can't read. Add an HTTP location that relying parties can reach (here, pki.contoso.com, served by IIS from the CA's CertEnroll folder):
Add-CACrlDistributionPoint -Uri "http://pki.contoso.com/CertEnroll/<CAName><CRLNameSuffix><DeltaCRLAllowed>.crl" `
  -AddToCertificateCdp -Force
Add-CAAuthorityInformationAccess -Uri "http://pki.contoso.com/CertEnroll/<ServerDNSName>_<CAName><CertificateName>.crt" `
  -AddToCertificateAia -Force

Restart-Service certsvc
certutil -crl
The angle-bracket tokens are literal CA variables, typed exactly as shown; the CA replaces them when it writes each certificate.
Checkpoint 2
certutil -ping reports that the CA interface is alive. Open pkiview.msc (Enterprise PKI): every AIA and CDP location for Contoso Lab Root CA shows OK, including the new HTTP ones.
| If it fails | Fix |
|---|---|
Install-AdcsCertificationAuthority access denied | Run it as an Enterprise Admin; an Enterprise CA writes to the AD configuration partition |
| pkiview shows the HTTP CDP as Unable to download | The DNS record, IIS site or CertEnroll folder permissions are missing; browse to the URL directly |
| CDP shows Expired | Publish a fresh CRL with certutil -crl |
Stage 3: Create the Certificate Templates
What you build: a SCEP template for device certificates, plus a web server certificate for NDES itself.
Open certtmpl.msc, right-click the User template and choose Duplicate Template. Configure the copy:
| Tab | Setting |
|---|---|
| General | Template display name Intune SCEP Device, template name IntuneSCEPDevice, validity 1 year |
| Compatibility | Certification Authority: Windows Server 2016; Certificate recipient: Windows 10 / Server 2016 |
| Subject Name | Supply in the request (accept the warning) |
| Extensions | Application Policies: remove everything except Client Authentication; Key Usage: Digital signature |
| Security | svc-ndes: Read and Enroll |
Then publish it on the CA:
Add-CATemplate -Name "IntuneSCEPDevice" -ForceNDES also needs an HTTPS certificate for its own website. Duplicate the Web Server template as NDES Web Server, grant CEL-NDES01's computer account Read and Enroll, publish it, and request a certificate for ndes.contoso.local from CEL-NDES01.
Checkpoint 3
certutil -CATemplates on the CA lists IntuneSCEPDevice and NDESWebServer. Get-ChildItem Cert:\LocalMachine\My on CEL-NDES01 shows the NDES web server certificate.
| If it fails | Fix |
|---|---|
Add-CATemplate says the template doesn't exist | Use the template name, not the display name; or wait for AD replication |
| The template is missing from the request wizard | Wrong Security permissions, or the template isn't published on the CA |
Stage 4: Install and Configure NDES
What you build: a SCEP endpoint that requests certificates from your CA using your template.
On the domain controller, register the service principal name NDES needs for Kerberos, and add the service account to the IIS group on the NDES server:
setspn -s HTTP/ndes.contoso.local contoso\svc-ndes# On CEL-NDES01
Add-LocalGroupMember -Group "IIS_IUSRS" -Member "contoso\svc-ndes"
Install-WindowsFeature ADCS-Device-Enrollment, Web-Filtering, Web-Asp-Net45, `
NET-WCF-HTTP-Activation45, Web-Metabase, Web-WMI -IncludeManagementTools
Install-AdcsNetworkDeviceEnrollmentService `
-ServiceAccountName "contoso\svc-ndes" `
-ServiceAccountPassword (Read-Host -AsSecureString "svc-ndes password") `
-CAConfig "CEL-CA01.contoso.local\Contoso Lab Root CA" -ForcePoint NDES at your template. All three registry values must use the template name:
$key = "HKLM:\SOFTWARE\Microsoft\Cryptography\MSCEP"
"SignatureTemplate", "EncryptionTemplate", "GeneralPurposeTemplate" |
  ForEach-Object { Set-ItemProperty -Path $key -Name $_ -Value "IntuneSCEPDevice" }
Intune SCEP requests are long URLs, so raise the request size limits in HTTP.sys and IIS:
$http = "HKLM:\SYSTEM\CurrentControlSet\Services\HTTP\Parameters"
New-ItemProperty -Path $http -Name MaxFieldLength -Value 65534 -PropertyType DWord -Force
New-ItemProperty -Path $http -Name MaxRequestBytes -Value 65534 -PropertyType DWord -Force

& "$env:windir\System32\inetsrv\appcmd.exe" set config `
  -section:system.webServer/security/requestFiltering `
  /requestLimits.maxUrl:65534 /requestLimits.maxQueryString:65534
Bind the NDES web server certificate to HTTPS (port 443) on the Default Web Site in IIS Manager, then restart the server so the HTTP.sys changes take effect. Finally, publish https://ndes.contoso.local through Entra application proxy so devices outside the office can reach it.
Checkpoint 4
From the NDES server, browse to https://ndes.contoso.local/certsrv/mscep/mscep.dll?operation=GetCACaps&message=test. NDES answers with a short plain-text list of its capabilities (for example POSTPKIOperation and SHA-256). Then repeat the test against your external application proxy URL from a device off the corporate network: you should get the same answer.
| If it fails | Fix |
|---|---|
| HTTP 503 | The SCEP application pool has stopped, usually a wrong svc-ndes password; fix it and start the pool |
| HTTP 500, or certificates later issued from the wrong template | A typo in one of the three MSCEP registry values; use the template name and run iisreset |
| Works internally, times out externally | The application proxy publication or a firewall rule is missing |
Stage 5: Install the Intune Certificate Connector
What you build: the bridge that lets Intune validate every SCEP request before NDES forwards it to the CA.
In the Intune admin center, go to Tenant administration > Connectors and tokens > Certificate connectors > Add, download the installer and run it on CEL-NDES01. In the configuration wizard:
- Select the SCEP feature, and Certificate revocation as well, so retired devices get their certificates revoked.
- Run the connector as SYSTEM, which is fine for a SCEP-only connector.
- Sign in with an Intune administrator account when prompted.
For revocation to work, give the connector's identity (for SYSTEM, the CEL-NDES01 computer account) Issue and Manage Certificates on the CA, under the CA's Properties > Security.

Checkpoint 5
The connector shows Active under Certificate connectors in Intune. On CEL-NDES01, Event Viewer under Applications and Services Logs > Microsoft > Intune > CertificateConnectors > Operational shows a successful start with no errors.
| If it fails | Fix |
|---|---|
| Sign-in fails during setup | IE Enhanced Security Configuration blocking the sign-in page, or a proxy blocking Microsoft endpoints |
| Connector shows inactive | Outbound HTTPS to Intune blocked, or TLS 1.2 disabled on the server |
Stage 6: Create the Intune Profiles
What you build: trust in your CA on the device, and a SCEP profile that tells the device exactly what to request.
Export the CA certificate on CEL-CA01:
certutil -ca.cert C:\Lab\ContosoLabRootCA.cerTrusted certificate profile: Devices > Configuration > Create > Windows 10 and later > Templates > Trusted certificate. Upload ContosoLabRootCA.cer, destination store Computer certificate store - Root, and assign it to GRP-SEC-WIN-PKILab-PIL.
SCEP certificate profile: Devices > Configuration > Create > Windows 10 and later > Templates > SCEP certificate, named WIN-PRD-SCEP-Device:
| Setting | Lab value |
|---|---|
| Certificate type | Device |
| Subject name format | CN={{AAD_Device_ID}} |
| Subject alternative name | DNS: {{DeviceName}} |
| Key storage provider | Enroll to Trusted Platform Module (TPM) KSP, otherwise fail |
| Key usage | Digital signature |
| Key size | 2048 |
| Hash algorithm | SHA-2 |
| Root certificate | The trusted certificate profile above |
| Extended key usage | Client Authentication, 1.3.6.1.5.5.7.3.2 |
| Renewal threshold | 20% |
| SCEP server URL | Your external NDES URL, ending in /certsrv/mscep/mscep.dll |
Assign it to the same group as the trusted certificate profile. This is the single most common reason a SCEP profile fails, and the deep dive explains why.
Checkpoint 6
Both profiles exist, both are assigned to GRP-SEC-WIN-PKILab-PIL, and the SCEP profile's root certificate setting points at your trusted certificate profile.
Stage 7: Enroll the Windows Device
What you build: a real certificate request from a real device.
On CEL-LT-0142, force a sync instead of waiting for the next check-in: Settings > Accounts > Access work or school > your account > Info > Sync. Within a few minutes, the trusted certificate profile applies first, then the SCEP profile.
Checkpoint 7
In Intune, the SCEP profile shows Succeeded for CEL-LT-0142. On the CA, Issued Certificates has a new entry from template IntuneSCEPDevice.
| If it fails | Fix |
|---|---|
| Trusted certificate profile succeeded, SCEP shows Error | Check the device log: Event Viewer > Applications and Services Logs > Microsoft > Windows > DeviceManagement-Enterprise-Diagnostics-Provider > Admin |
| Request appears under Failed Requests on the CA | Template permissions for svc-ndes, or a subject the template rejects |
| Fails only on some devices | No TPM 2.0 on those devices, with the profile requiring the TPM KSP |
| Nothing reaches NDES at all | The external NDES URL in the profile is wrong or unreachable; check the NDES IIS logs in C:\inetpub\logs\LogFiles |
Stage 8: Verify the Device Certificate
What you build: proof that the certificate is correct, protected, and verifiable by anything that receives it.

Run these on the device, in an elevated PowerShell session:
# 1. The certificate is there, issued by your CA, with Client Authentication
$cert = Get-ChildItem Cert:\LocalMachine\My |
  Where-Object { $_.Issuer -like "*Contoso Lab Root CA*" }
$cert | Format-List Subject, NotAfter, EnhancedKeyUsageList

# 2. The private key lives in the TPM
certutil -store My $cert.Thumbprint | Select-String "Provider"

# 3. The full chain and revocation check pass, fetched over the network
Export-Certificate -Cert $cert -FilePath C:\Temp\device.cer | Out-Null
certutil -verify -urlfetch C:\Temp\device.cer
Checkpoint 8
The subject is CN= followed by the device's Entra device ID, and the EKU list shows Client Authentication. The provider line reads Microsoft Platform Crypto Provider, meaning the key is in the TPM. certutil -verify -urlfetch ends with the certificate verified and every CDP and AIA URL retrieved successfully.
| If it fails | Fix |
|---|---|
| Provider is a software provider | The profile allowed a software fallback; set the KSP to TPM only and reissue |
-urlfetch fails on the CDP | The HTTP CRL location from Stage 2 isn't reachable from where the device is; the RADIUS server will hit the same failure |
Stage 9: Use the Certificate for Wi-Fi and VPN
What you build: the reason the whole lab exists, a network connection authenticated by the certificate with no password involved. For how 802.1X, RADIUS and VPN authentication work underneath, see certificate-based authentication end-to-end.
Wi-Fi (EAP-TLS)
On the RADIUS side, configure a network policy that accepts EAP-TLS (in Microsoft NPS: Microsoft: Smart Card or other certificate), and make sure the RADIUS server trusts Contoso Lab Root CA and can reach its HTTP CRL.
In Intune, create a Wi-Fi profile (Devices > Configuration > Create > Windows 10 and later > Templates > Wi-Fi, type Enterprise):
- EAP type: EAP-TLS
- Certificate server names: the name on your RADIUS server's certificate
- Root certificates for server validation: your trusted certificate profile
- Client authentication certificate:
WIN-PRD-SCEP-Device
NPS and cloud-only devices
Microsoft NPS authenticates certificates against on-premises Active Directory. An Entra joined device with no AD computer object can be issued a perfect certificate and still be rejected by NPS. For the Wi-Fi part of this lab, either test with a hybrid joined device, or use a cloud RADIUS service, which is what most cloud-native organisations end up doing.
VPN
Create a VPN profile for your gateway (Templates > VPN), set the authentication method to Certificates, and select the same SCEP profile. The VPN gateway must trust Contoso Lab Root CA and reach its CRL, exactly like the RADIUS server.
Checkpoint 9
netsh wlan show interfaces shows the device connected to the corporate SSID with no password prompt. On NPS, the Security event log shows event 6272 (access granted) for the device. The VPN connects with certificate authentication, and the gateway's log shows the certificate's subject.
| If it fails | Fix |
|---|---|
| NPS logs event 6273 (access denied) | The reason code in the event names the cause: no matching policy, no AD mapping, or a failed revocation check |
| Device doesn't offer the certificate | The Wi-Fi or VPN profile references a different SCEP profile, or the EKU lacks Client Authentication |
| Revocation check fails on the gateway | The gateway can't reach the HTTP CDP from Stage 2 |
From Lab to Production
The lab works, but it cuts corners that production must not:
| Lab shortcut | Production design |
|---|---|
| Single Enterprise Root CA | Offline Root CA plus an online Issuing CA |
| One NDES server and one connector | Two of each, on separate servers |
| CRL published, nobody watching it | CRL expiry monitored, Root CRL renewal owned by a named person |
| CA keys in software | CA keys in an HSM |
svc-ndes with a never-expiring password | Group managed service account or a rotated, monitored credential |
If running all of this yourself looks like more than your team wants to own, compare it against the hosted alternative first: Microsoft Cloud PKI vs AD CS covers exactly that decision.
Summary
You built every link of the chain: a CA with revocation published over HTTP, a template that accepts Intune's subject, NDES mapped to that template, a connector that lets Intune vouch for each request, profiles that tell the device what to ask for, and a TPM-backed device certificate that Wi-Fi and VPN accept without a password.
The checkpoints are worth keeping after the lab. They are the same checks, in the same order, that you will use the first time a production device fails to get its certificate. Start at the top of the chain and work down until one fails. For where this certificate fits in a complete device build, see building a secure Windows endpoint from scratch.

Written by
Chetan Yamger
Cloud Engineer · AI Automation Architect · Modern Workplace Consultant
Cloud Engineer, AI Automation Architect, and Modern Workplace Consultant based in Amsterdam, Netherlands. Specializing in scalable, secure enterprise solutions with Microsoft Azure, Intune, PowerShell, and AI-driven automation using ChatGPT, Gemini, and modern LLM technologies.
Stay in the loop.
New articles, straight to you.
Deep-dive technical articles on Intune, PowerShell, and AI — no noise, no spam.
Discussion
Share your thoughts — your email stays private
Leave a comment